Circuit Components Reference
Please Log In for full access to the web site.
Note that this link will take you to an external site (https://accounts.google.com) to authenticate, and then you will be redirected back to this page.
Your visual guide to all the components used in this course. Each section includes images, pinouts, and what the component does.
Need a datasheet? Google "[chip number] datasheet" - always available online!
Passive Components
Resistor
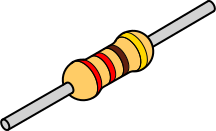
What it does: Limits current flow and creates voltage drops
Measured in: Ohms (Ω), kilohms (kΩ), megohms (MΩ)
Key specs: Resistance value, power rating (usually 1/4W)
How to identify: Color bands (use color code chart)
Common values: 220Ω, 330Ω, 1kΩ, 10kΩ
Symbols:
This symbol is the most commonly used outside of the USA, and is what we will be using in this course:

This symbol is most often used in America:

Critical rule: Always use current-limiting resistor with LEDs!
Capacitor (Ceramic)
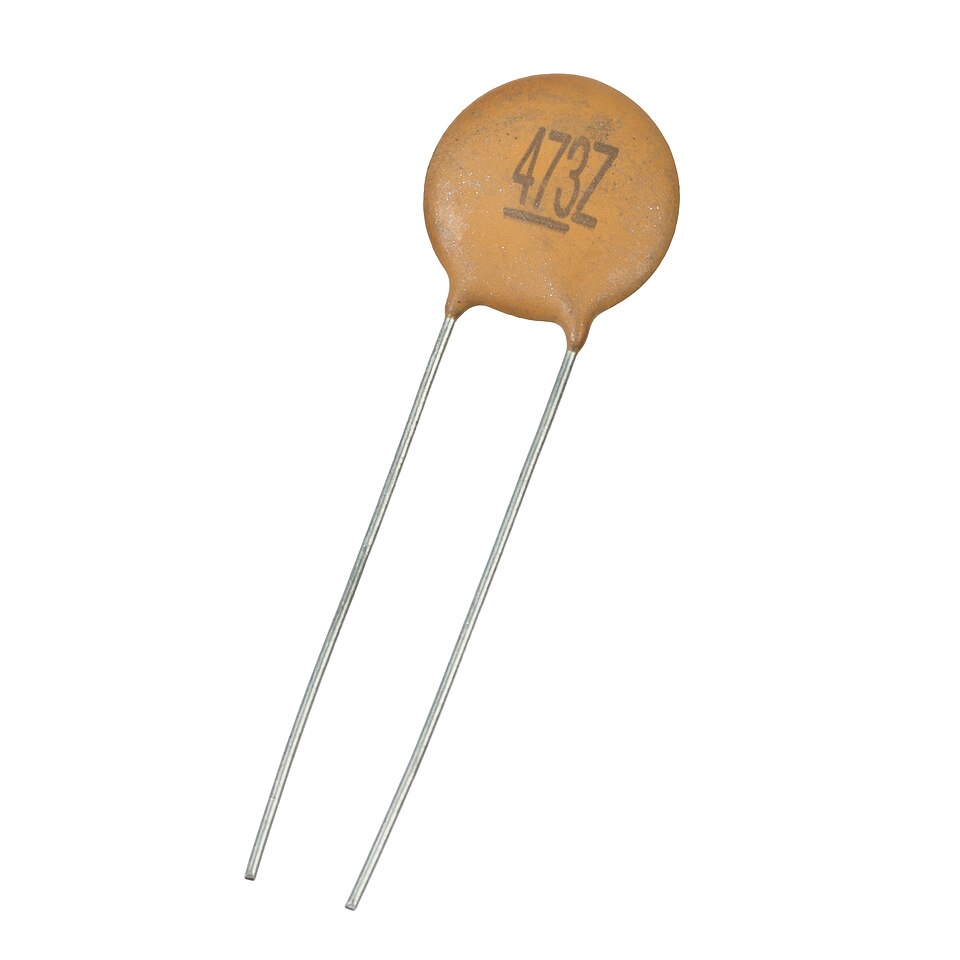
What it does: Stores electrical charge, filters noise, creates timing circuits
Measured in: Farads (F), microfarads (μF), nanofarads (nF), picofarads (pF)
Polarity: Non-polarized (can be inserted either way)
Common values: 100nF (0.1μF), 10μF, 100μF
Used for: Decoupling, debouncing, RC timing circuits
Symbol:

Capacitor (Electrolytic)
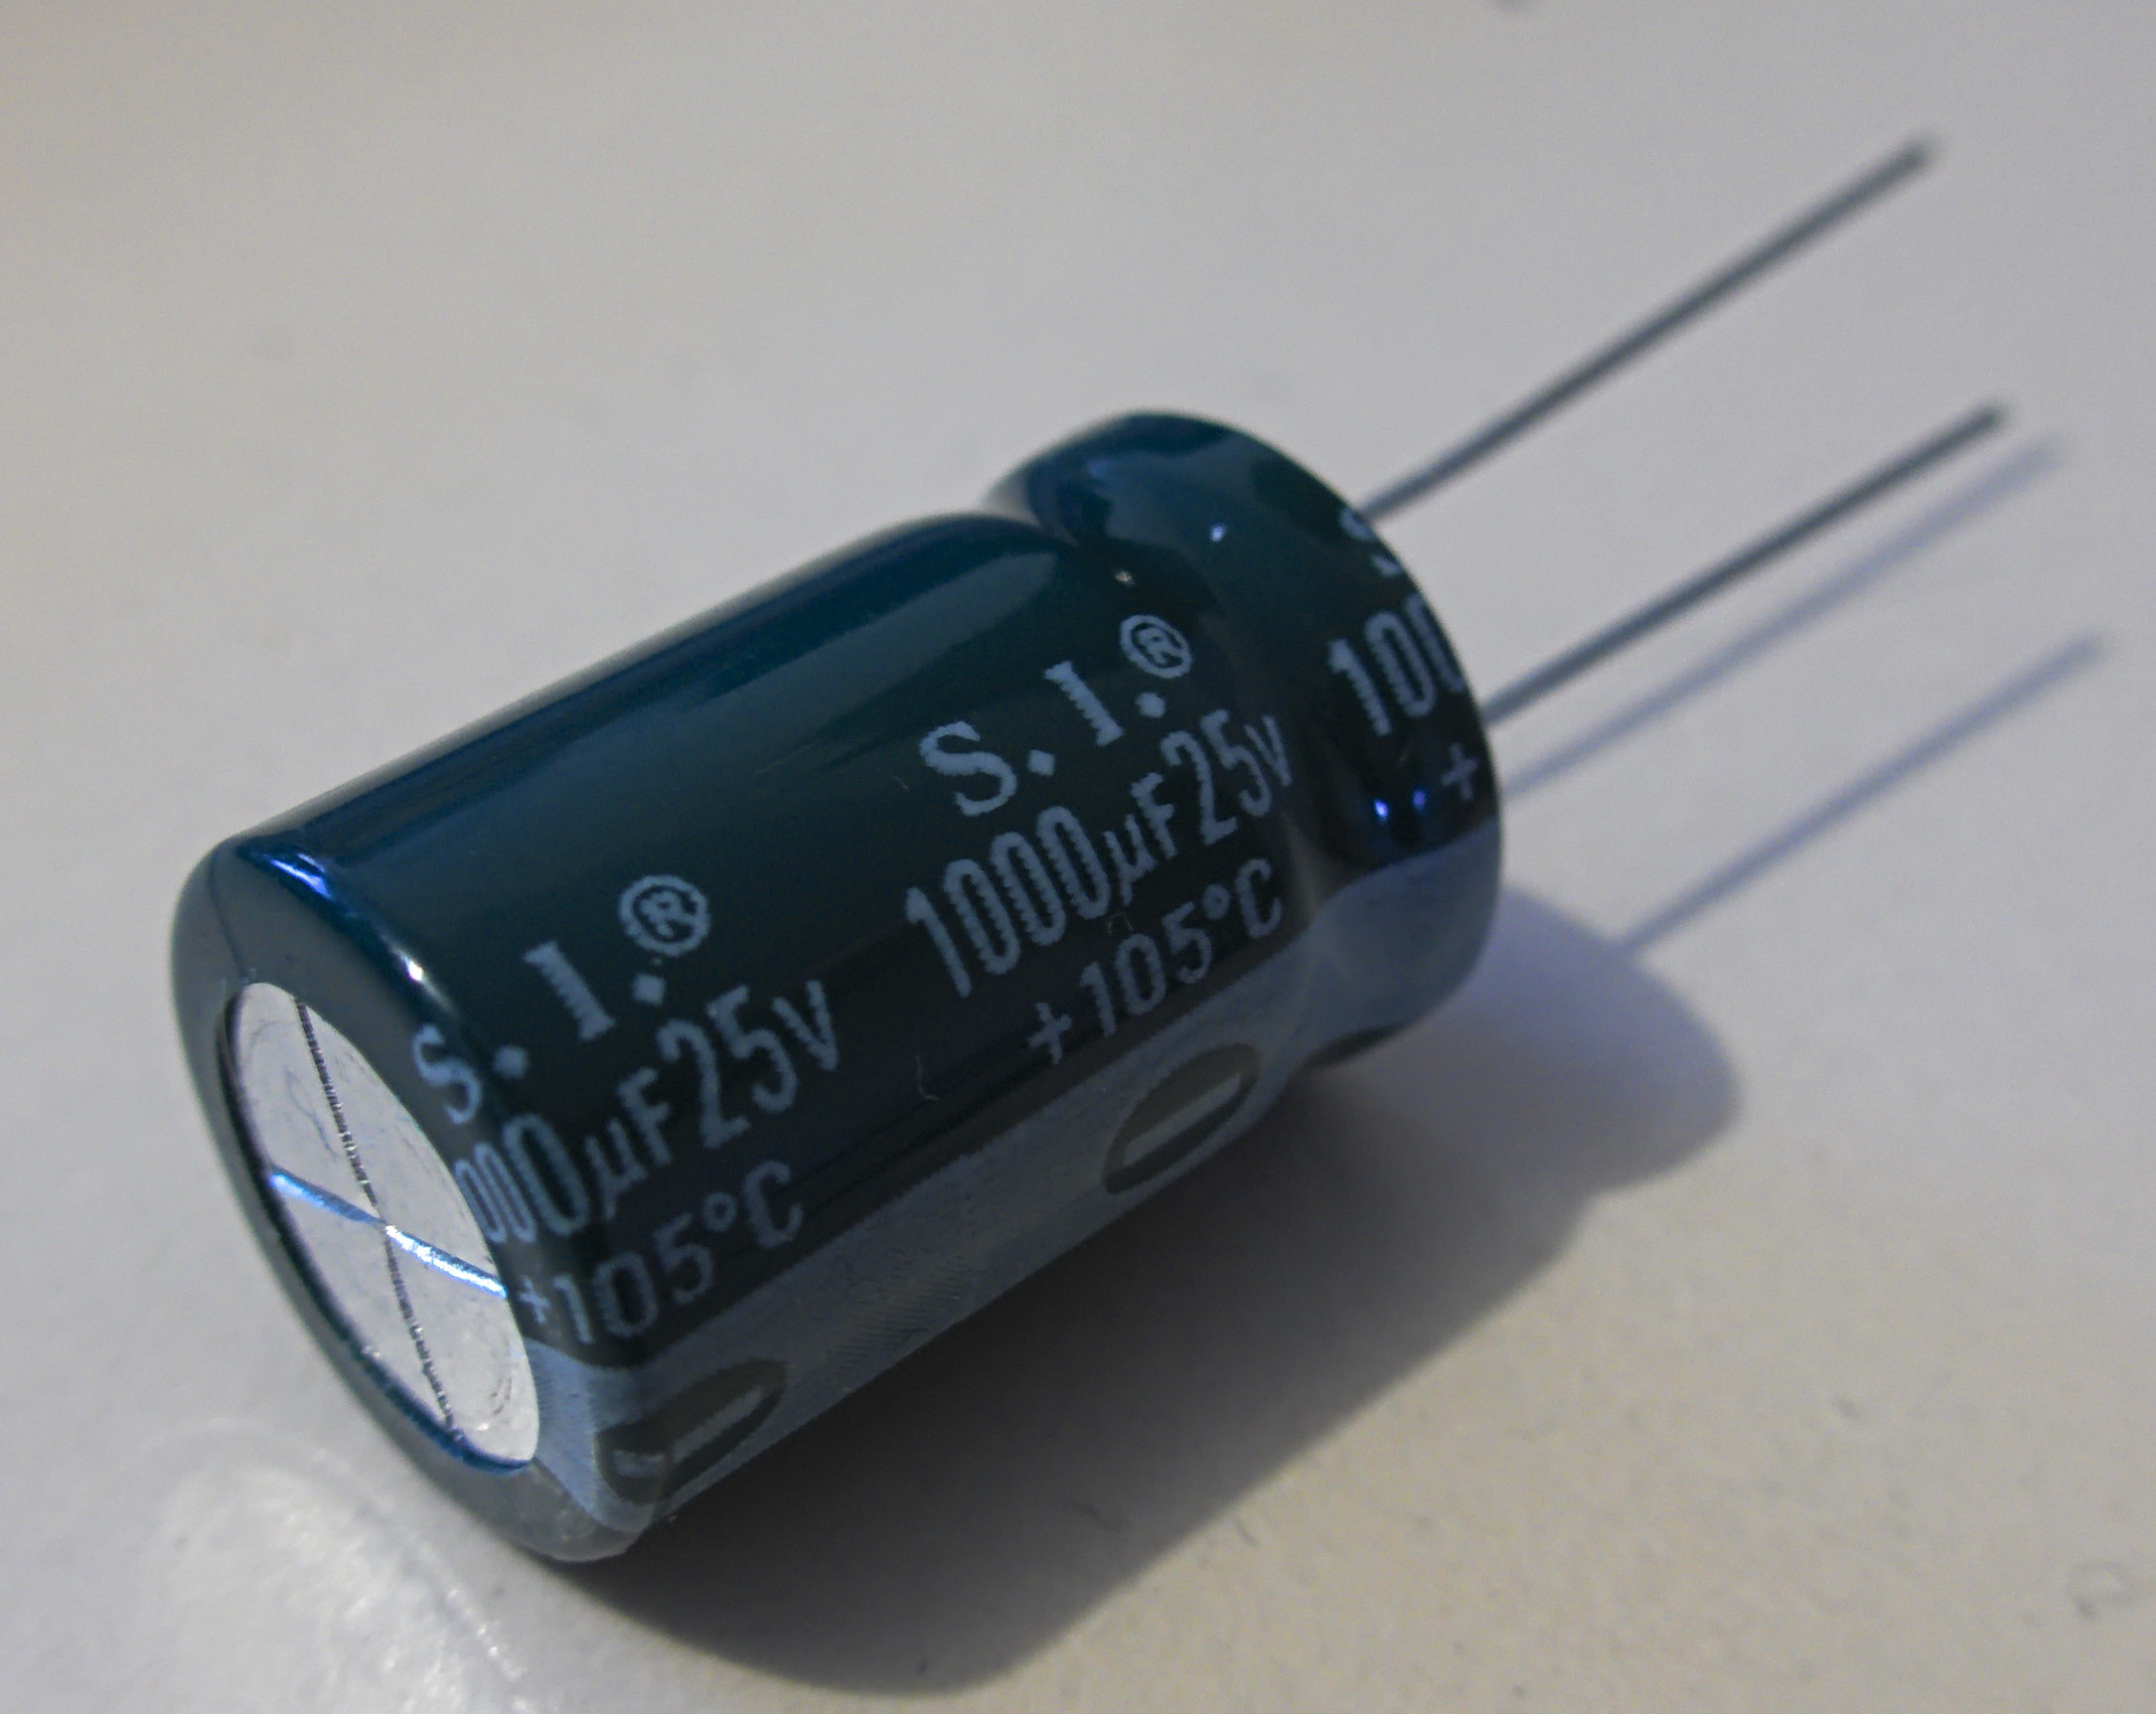
What it does: Same as ceramic, but higher capacitance values
Measured in: Microfarads (μF)
Polarity: YES - POLARIZED! Long lead = positive (+), short lead = negative (-)
Common values: 10μF, 100μF, 1000μF
Used for: Power supply filtering, timing circuits
The following four symbols (with the positive terminal marked) are all commonly used:
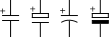
⚠️ Warning: Connect backwards and it can explode! Always check polarity.
Diode
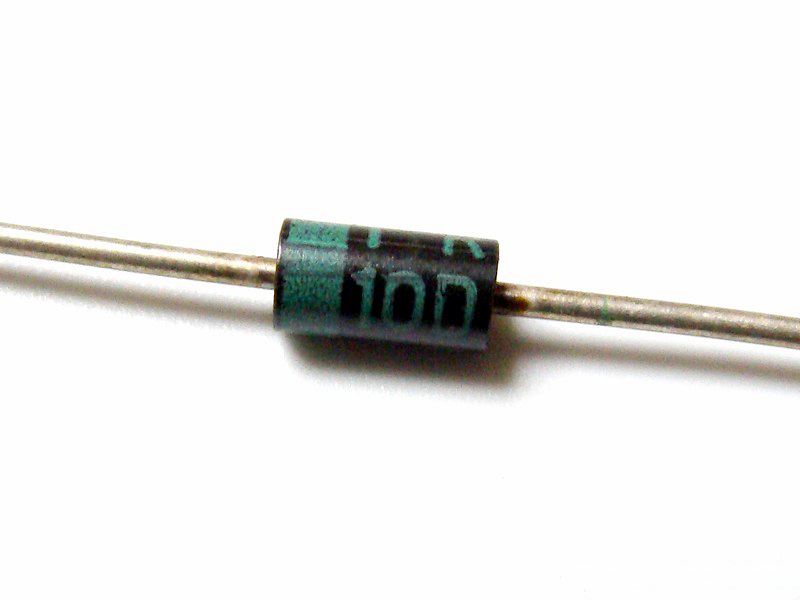
What it does: Allows current flow in only one direction
Polarity: Cathode (marked with stripe) = negative, Anode = positive
Common type: 1N4148 (signal diode), 1N4007 (power diode)
Used for: Reset logic, protection, rectification
Forward voltage drop: ~0.7V
Symbol:
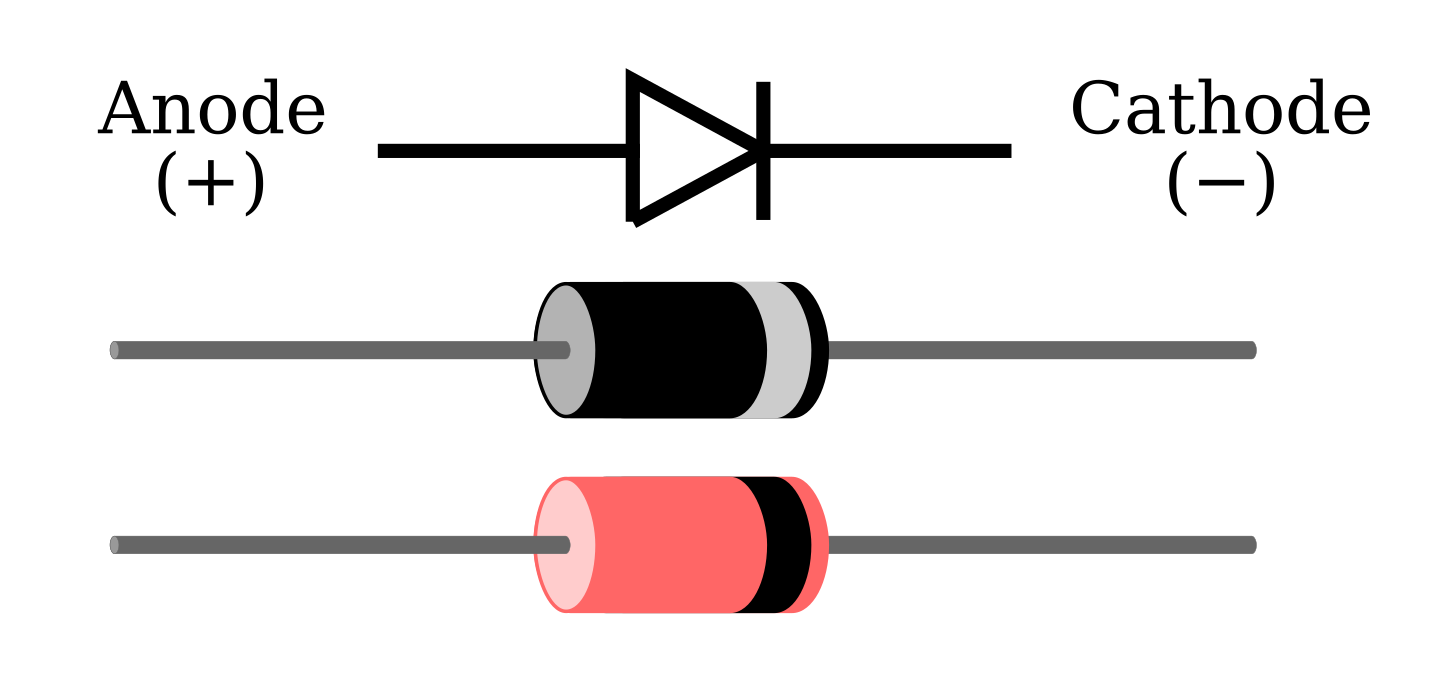
How to use: Current flows from anode to cathode (stripe side)
Active Components
LED (Light-Emitting Diode)
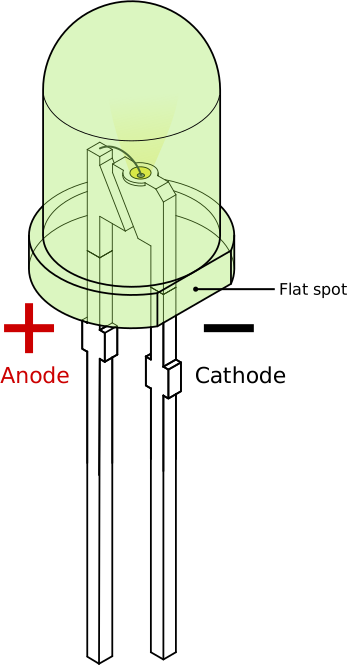
What it does: Emits light when current flows through it
Polarity: Long leg = Anode (+), Short leg = Cathode (-)
Forward voltage: ~2V (red), ~3V (blue/white)
Typical current: 20mA
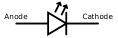
Symbol:
⚠️ Critical: ALWAYS use a current-limiting resistor (typically 220Ω-330Ω with 5V)
Resistor calculation: R = (Vsupply - VLED) / 0.02A
Example: R = (5V - 2V) / 0.02A = 150Ω → use 220Ω
Push Button
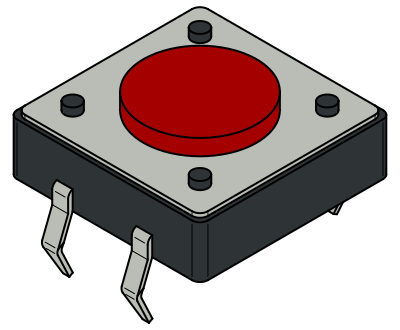
What it does: Momentary switch that completes circuit when pressed
Pins: 4 pins - two pairs internally connected
Used for: Clock input, reset, user input
Symbol:

Note: Buttons "bounce" - they make/break contact multiple times. Needs debouncing!
Integrated Circuits (ICs)
Breadboard & DIP Package Basics
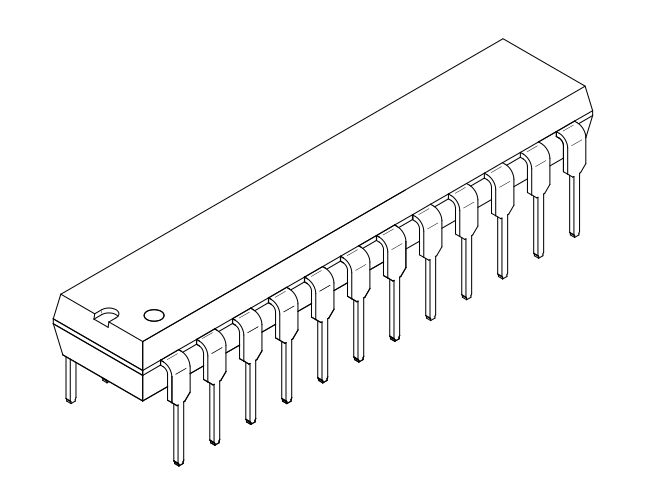
All ICs in this course use DIP (Dual In-line Package):
- Two parallel rows of pins
- Pin 1 marked with notch or dot
- Pins numbered counter-clockwise from Pin 1
- Always straddle the breadboard center gap
Standard pinout: Pin 1 (top-left) → Pin N (top-right) → Pin N+1 (bottom-right) → Pin 2N (bottom-left)
CD4026 - Decade Counter with 7-Segment Decoder
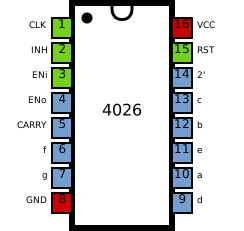
What it does: Counts 0-9 and directly drives 7-segment display
Package: 16-pin DIP
Power: Pin 16 = Vcc (+5V), Pin 8 = GND
Key pins:
- Pin 1: Clock input (rising edge triggers count)
- Pin 2: Carry out (goes high on 9→0 transition)
- Pin 15: Reset (active high - tie to GND for normal operation)
- Pins 3-11: Seven-segment outputs (a-g)
Pinout diagram:
Used in: Module 1 & 2 (Counters and Clocks)
555 Timer
What it does: Versatile timing IC - generates clock pulses, delays, oscillations
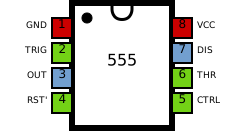
Package: 8-pin DIP
Power: Pin 8 = Vcc (+5V), Pin 1 = GND
Modes: Astable (oscillator), Monostable (one-shot), Bistable (flip-flop)
Key pins:
- Pin 2: Trigger (starts timing)
- Pin 3: Output
- Pin 4: Reset (tie to Vcc if not used)
- Pin 5: Control voltage (bypass to GND with 10nF cap)
- Pin 6: Threshold
- Pin 7: Discharge
Pinout diagram:
Astable mode (oscillator): Add resistors and capacitor to generate clock signal
Used in: Module 1 (Timing Circuits)
7448 - BCD to 7-Segment Decoder
What it does: Converts 4-bit binary (BCD) to 7-segment display format
Package: 16-pin DIP
Power: Pin 16 = Vcc (+5V), Pin 8 = GND
Inputs: Pins A, B, C, D (4-bit BCD input)
Outputs: 7-segment outputs a-g
Pinout diagram:
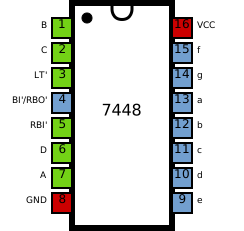
Used in: Module 3 (Decoders)
74181 - 4-bit ALU
What it does: Performs 16 arithmetic and 16 logic operations on 4-bit inputs
Package: 24-pin DIP
Power: Pin 24 = Vcc (+5V), Pin 12 = GND
Inputs: Two 4-bit operands (A and B), function select
Outputs: 4-bit result, carry, comparator outputs
Pinout diagram:
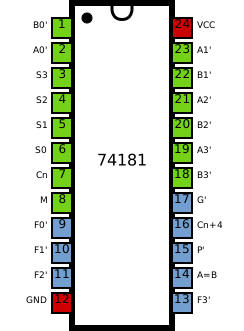
Used in: Module 5 (ALU Basics)
74283 - 4-bit Binary Full Adder
What it does: Adds two 4-bit binary numbers plus carry input
Package: 16-pin DIP
Power: Pin 16 = Vcc (+5V), Pin 8 = GND
Inputs: Two 4-bit numbers (A0-A3, B0-B3), Carry In
Outputs: 4-bit sum, Carry Out
Pinout diagram:
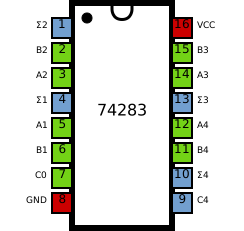
Used in: Module 5 (Calculators)
28C256 - 32KB EEPROM
What it does: Stores 32,768 bytes of data that persists without power
Package: 28-pin DIP
Power: Pin 28 = Vcc (+5V), Pin 14 = GND
Capacity: 32KB (256K bits)
Address lines: A0-A14 (15 address lines)
Data lines: D0-D7 (8-bit data)
Pinout diagram:
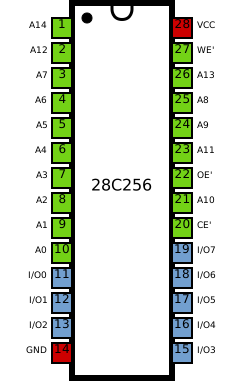
Used in: Module 4 & 7 (Memory and Lookup Tables)
Logic Gates (7400 series)
Common 7400 series chips:
- 7400: Quad 2-input NAND
- 7402: Quad 2-input NOR
- 7404: Hex Inverter (NOT)
- 7408: Quad 2-input AND
- 7432: Quad 2-input OR
- 7486: Quad 2-input XOR
Package: 14-pin DIP
Power: Pin 14 = Vcc (+5V), Pin 7 = GND
Displays
7-Segment Display (Common Cathode)
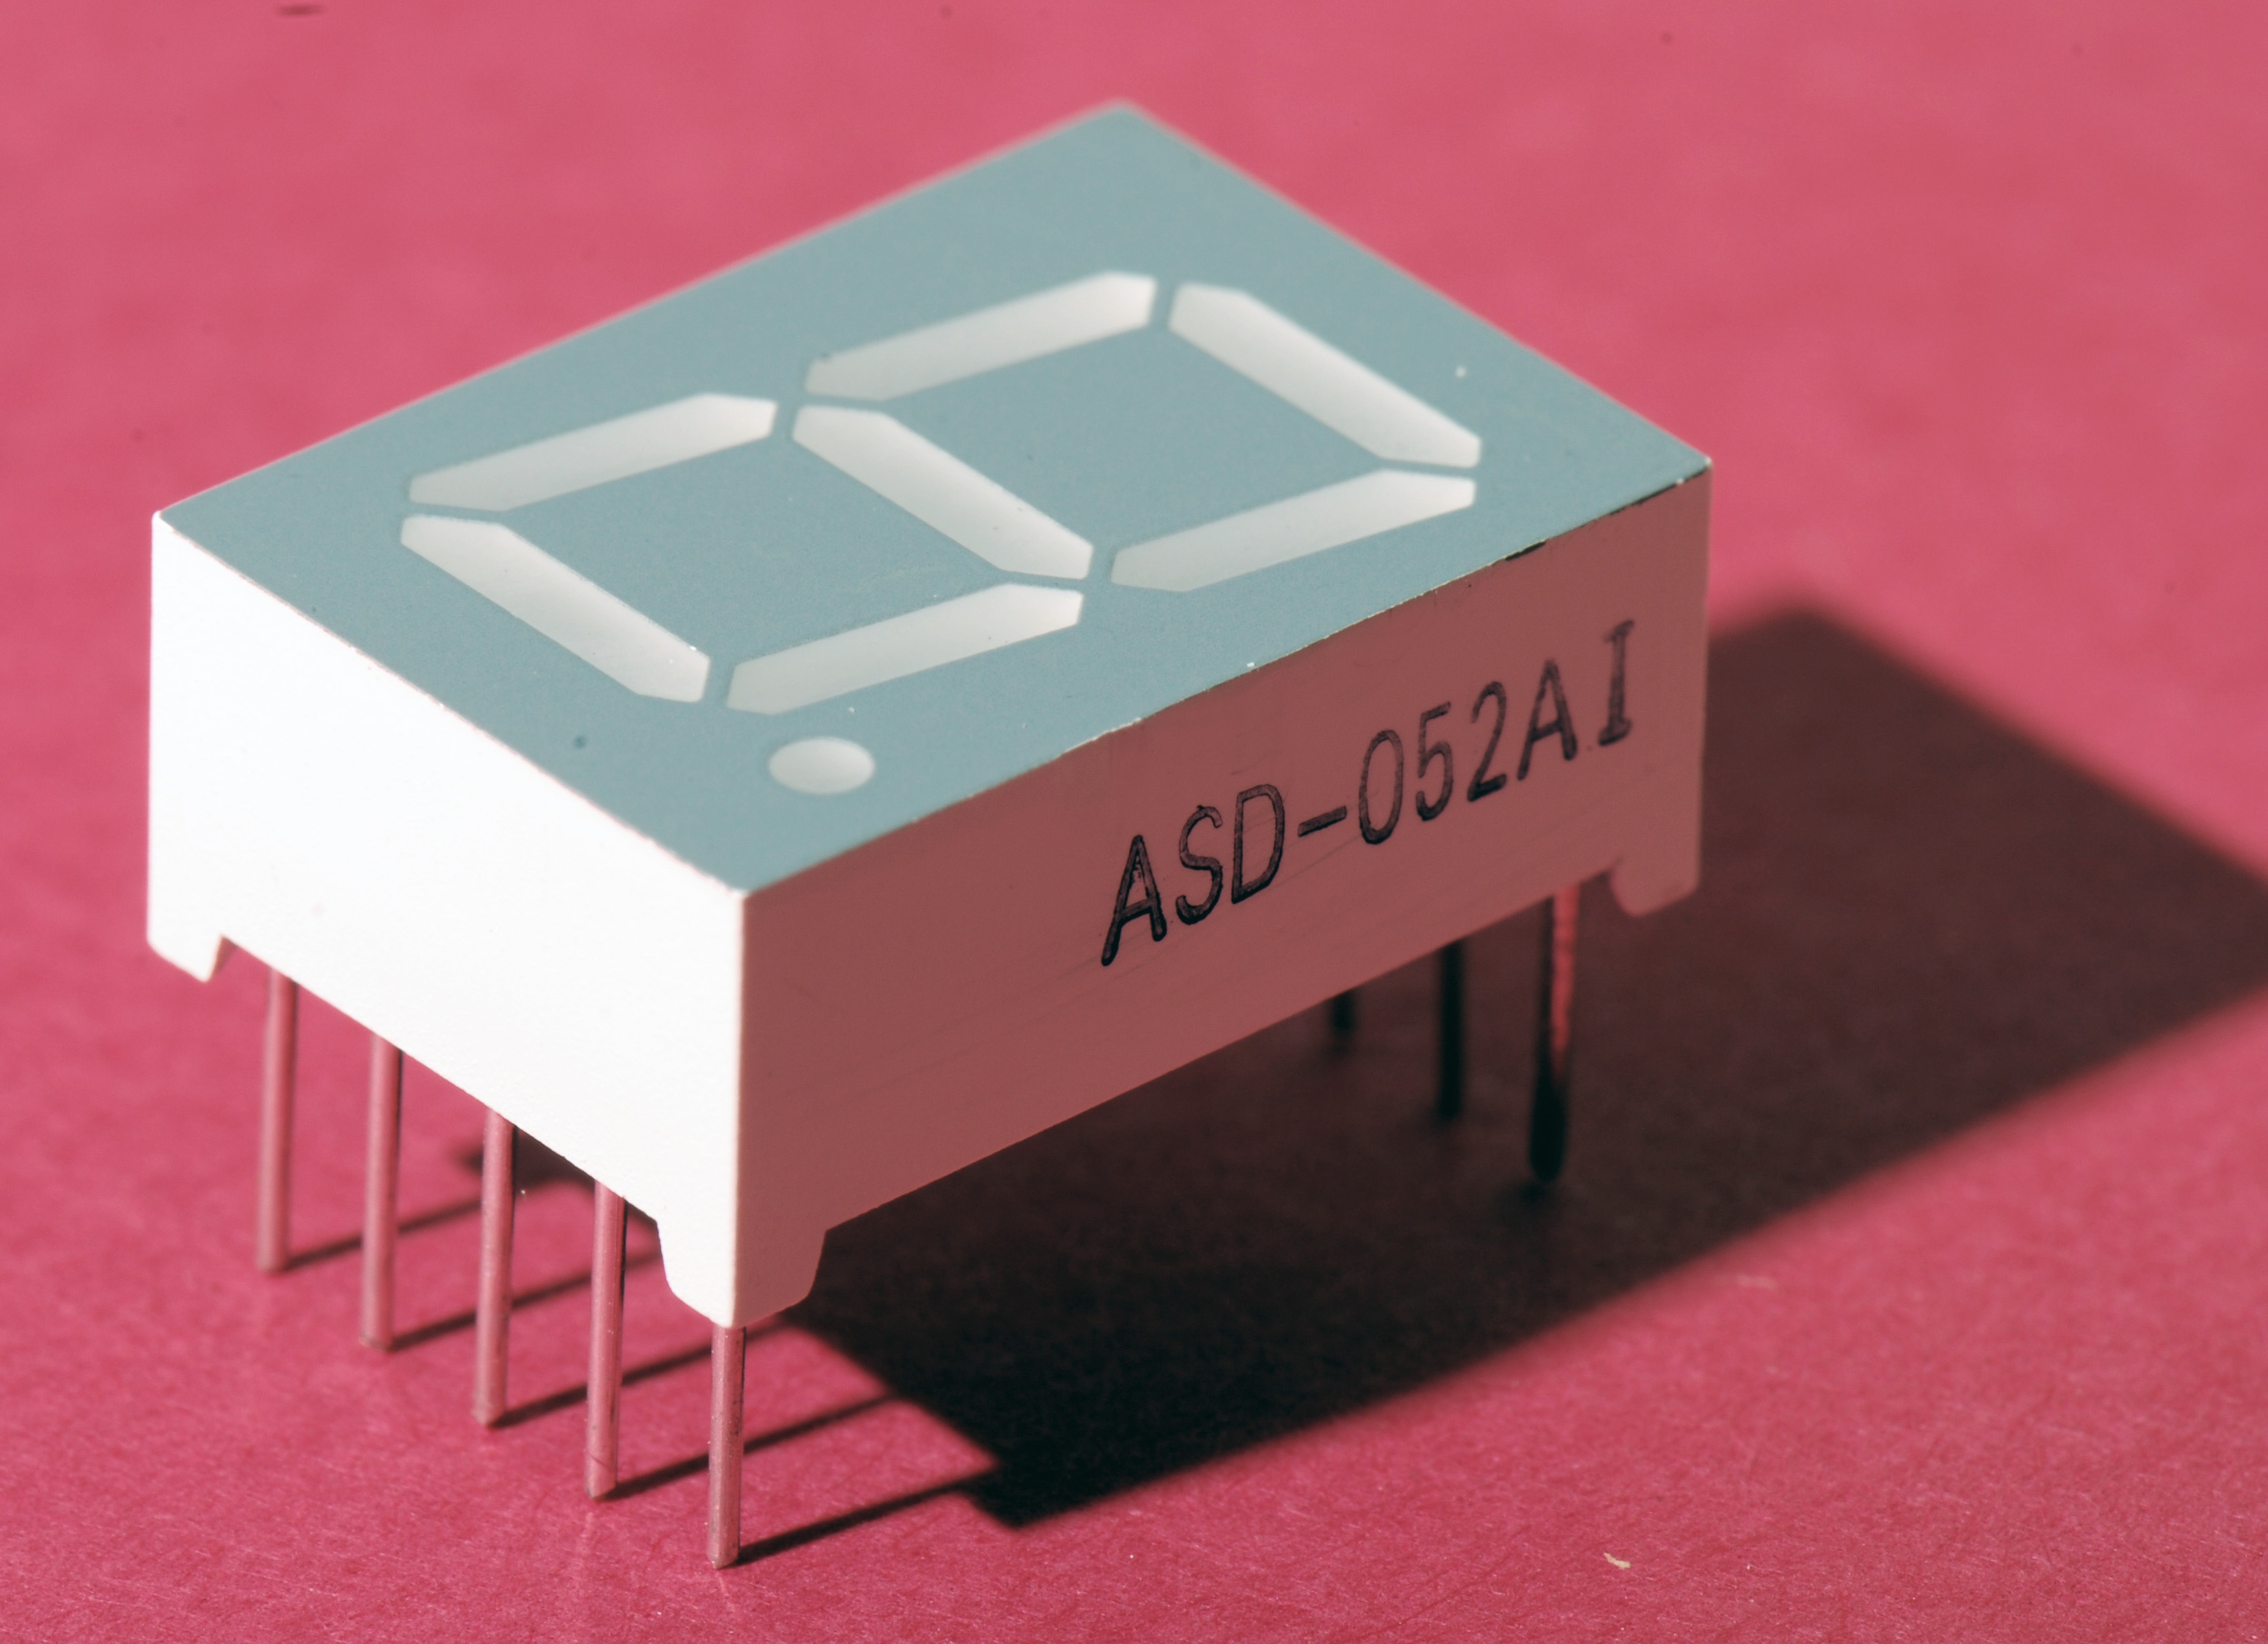
What it does: Displays digits 0-9 (and some letters)
Segments: 7 LEDs arranged in figure-8 pattern (a-g) + decimal point
Types:
- Common Cathode: All cathodes connected together → connect to GND
- Common Anode: All anodes connected together → connect to Vcc
Pinout and segment layout (common-cathode configuration)
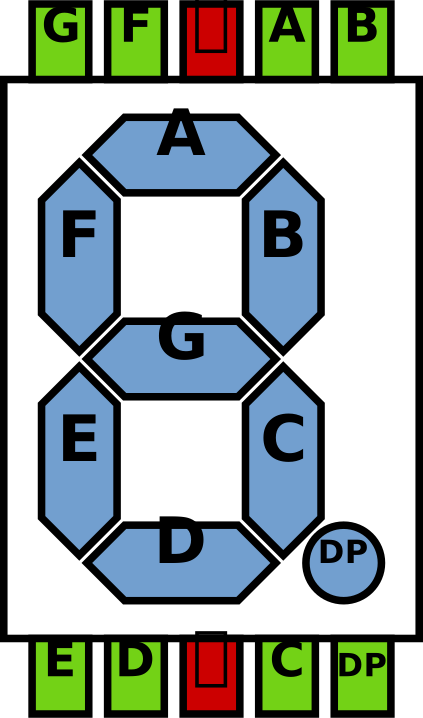
⚠️ Important: Each segment needs current-limiting resistor (220Ω typical)
Used in: All Modules
Power & Tools
Breadboard
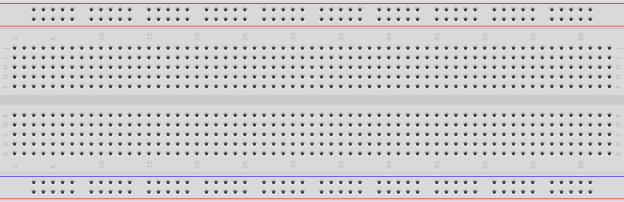
What it does: Temporary circuit prototyping without soldering
Power rails: Red (+) and Blue (-) lines run the full length
Component area: 5 holes connected vertically in each row
Center gap: For straddling ICs
Internal connections:
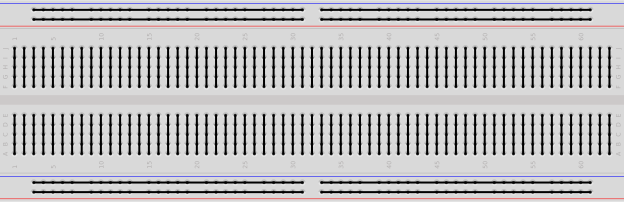
Pro tip: Test power rail continuity - some breadboards have breaks in the middle!
Jumper Wires
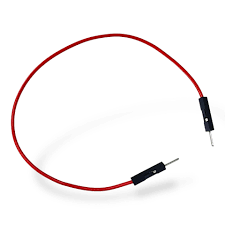
Types:
- Solid core: For breadboards (holds shape, doesn't bend easily)
- Stranded: For connections that move (more flexible)
Color coding (recommended):
- Red: Power (Vcc, +5V)
- Black: Ground (GND, 0V)
- Other colors: Signals
Sizes: Pre-cut or spool (strip and cut to length)
Power Supply
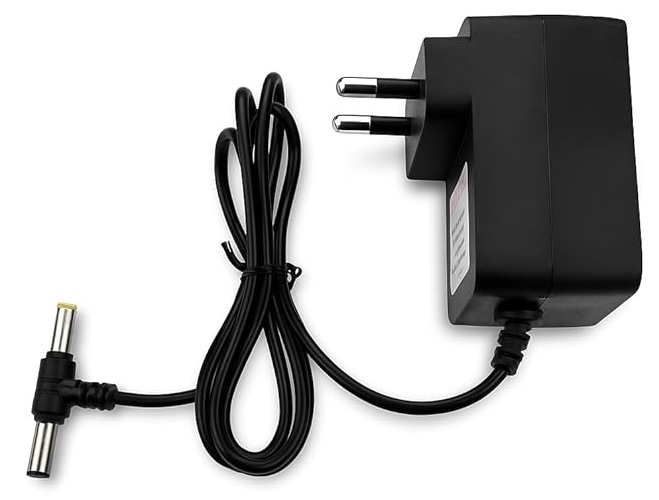
What you need: 5V DC regulated power supply
Options:
- Wall adapter (5V, 1A+)
- USB power bank (5V)
- Breadboard power supply module
- 4× AA batteries (6V - works but slightly high)
Connector: Match to breadboard power rails
Multimeter
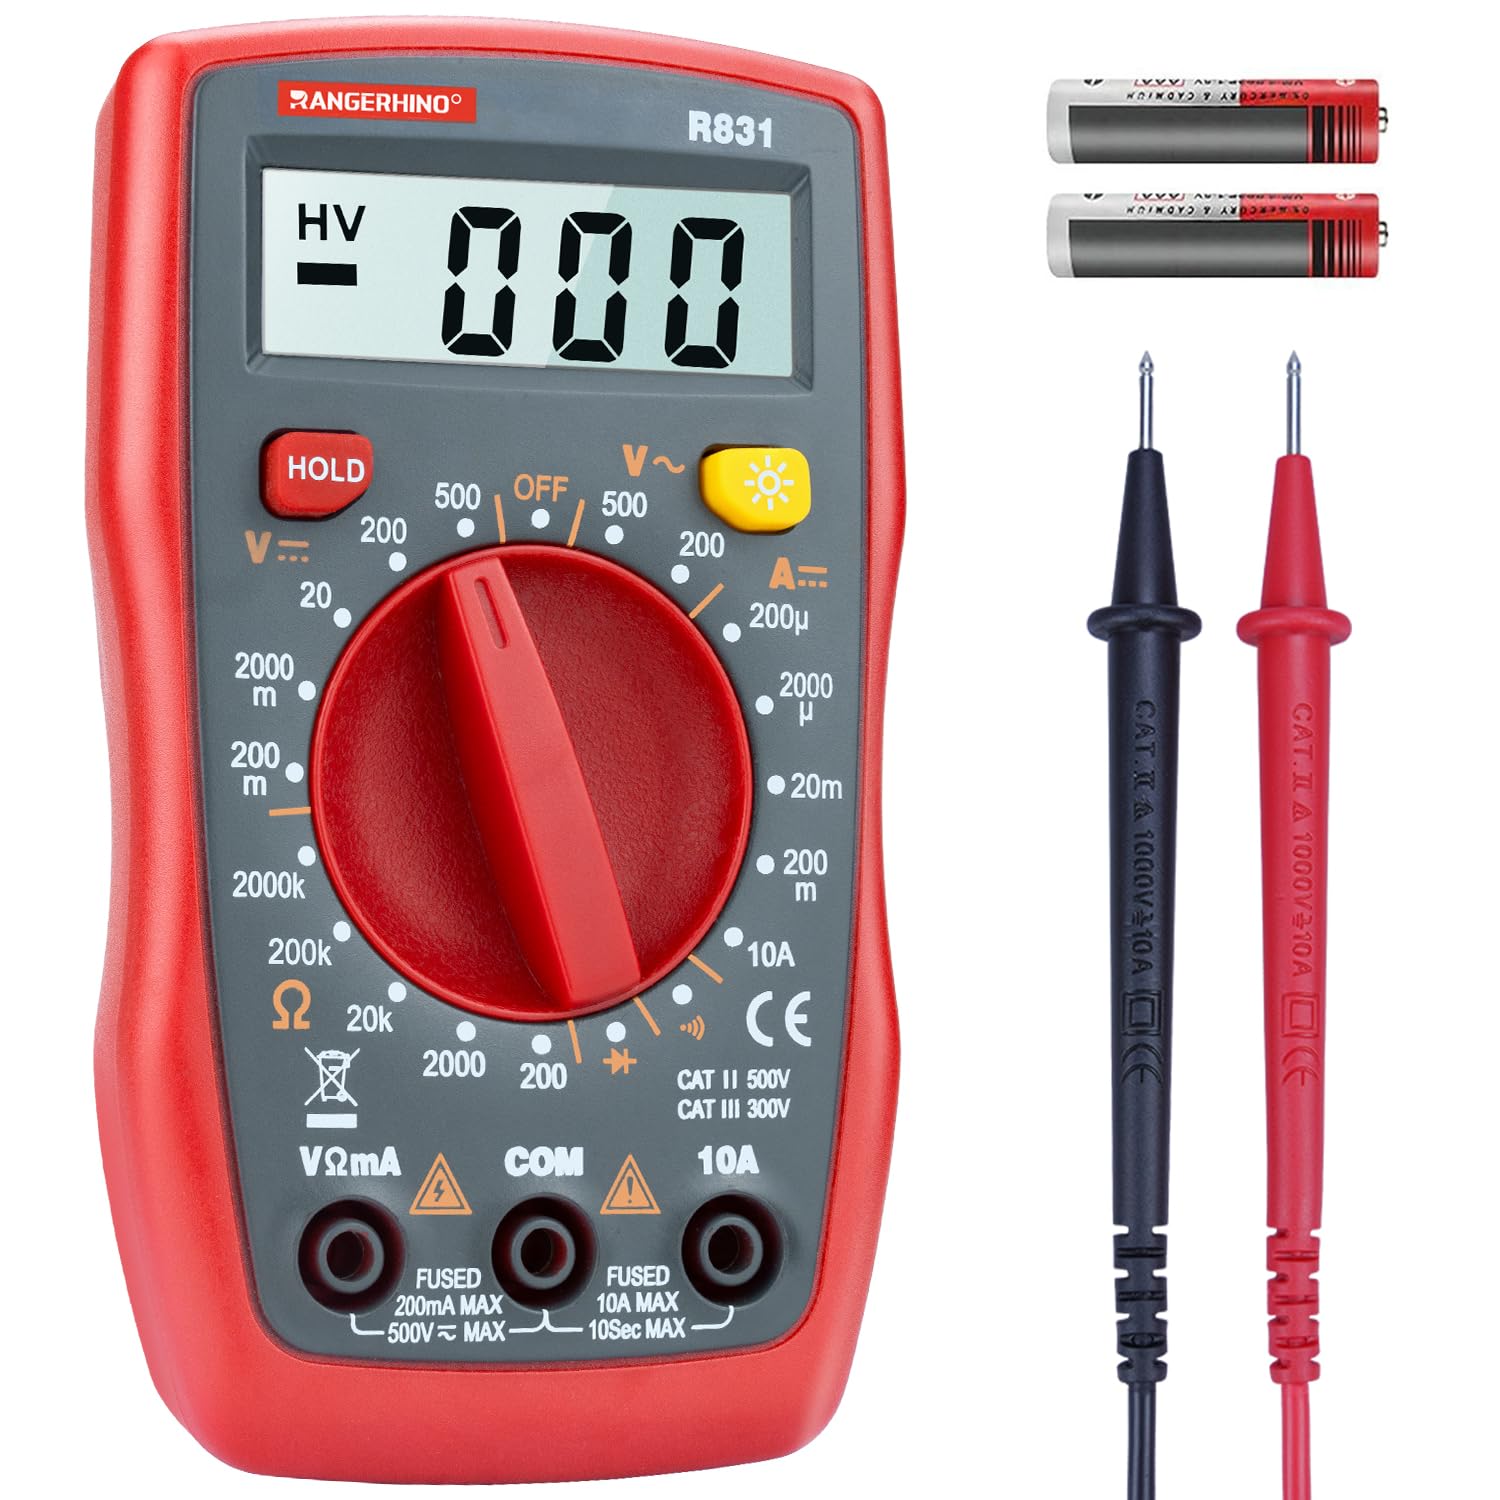
Essential tool for debugging!
Modes you'll use:
- DC Voltage (V⎓): Measure Vcc, signal levels
- Continuity (♪): Test connections (beeps if connected)
- Resistance (Ω): Check resistor values
How to use:
- Black probe → COM (common/ground)
- Red probe → measurement point
- Select appropriate mode
Quick Reference Tables
IC Power Pins
| IC Family | Vcc Pin | GND Pin | Voltage |
|---|---|---|---|
| CD40xx (16-pin) | 16 | 8 | 5V |
| 74xx (14-pin) | 14 | 7 | 5V |
| 74xx (16-pin) | 16 | 8 | 5V |
| 555 Timer | 8 | 1 | 5V |
Rule: ALWAYS connect power pins first!
Resistor Color Code
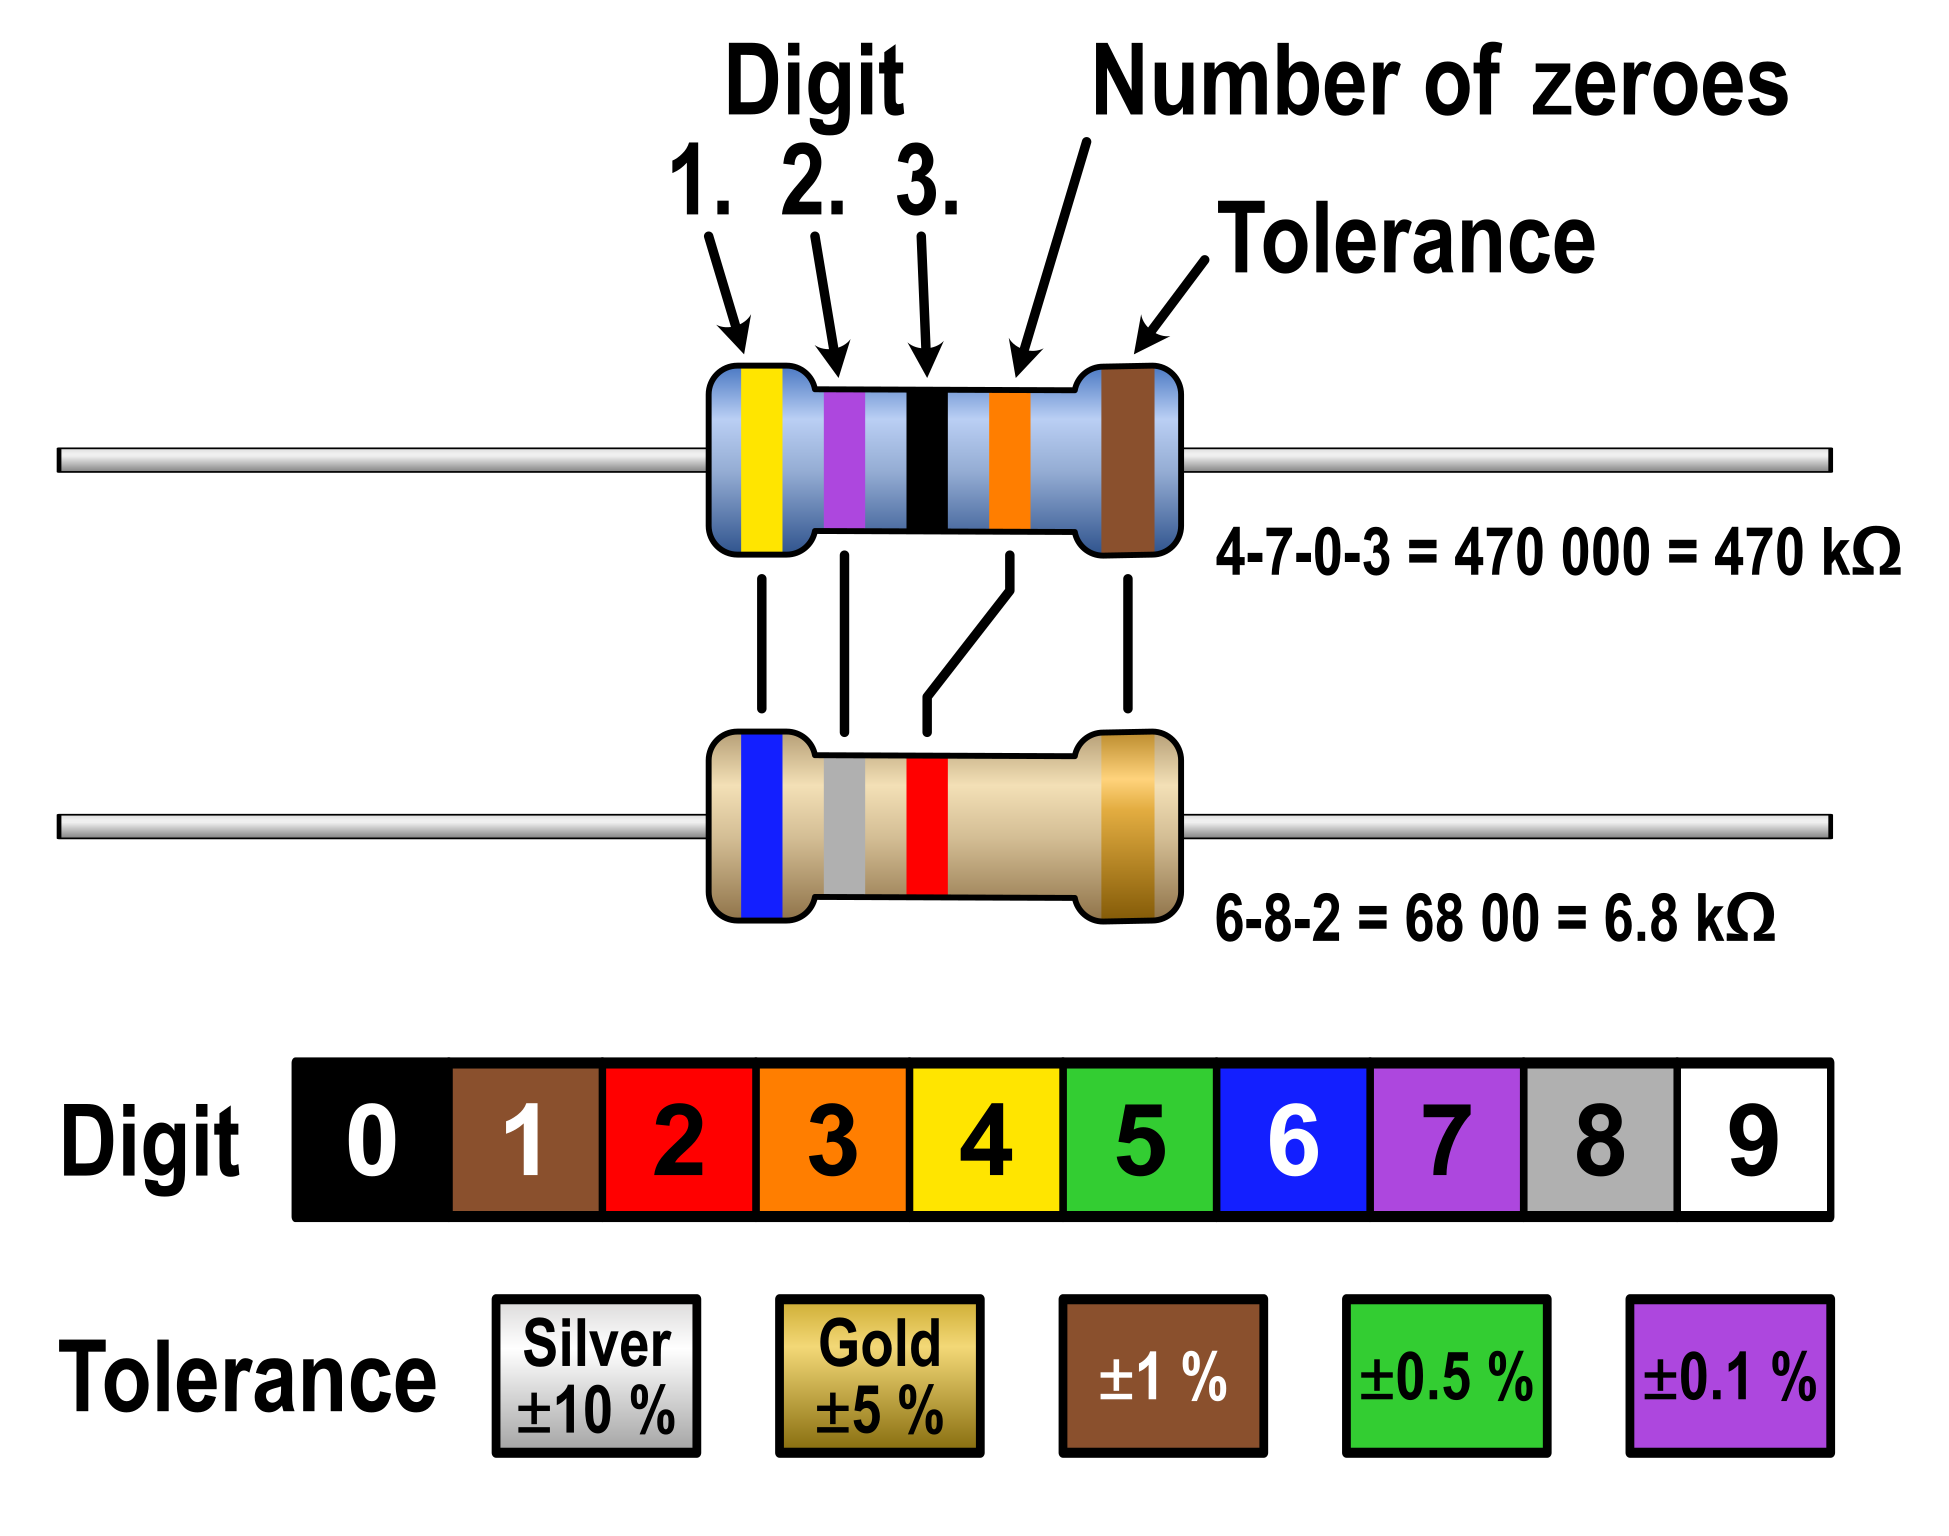
Common values:
- 220Ω: Red-Red-Brown (LED current limiting)
- 330Ω: Orange-Orange-Brown (LED current limiting)
- 1kΩ: Brown-Black-Red (pull-up/pull-down)
- 10kΩ: Brown-Black-Orange (pull-up/pull-down)
Capacitor Code Decoder
Ceramic capacitor markings:
- 104 = 10 × 10⁴ pF = 100,000pF = 100nF = 0.1μF
- 103 = 10 × 10³ pF = 10,000pF = 10nF = 0.01μF
Electrolytic: Usually marked directly (e.g., "100μF 16V")